Chocolate Cake with Oreo and Ganache

IMG_20170706_174103_278

I have limited experience with cakes. Vanilla? Doable. Date/khajur cake? I can ace at. Ragi and chocolate cake? Cheat day indulgence.

But a normal, basic chocolate cake? … Hellooo, there, anxiety!

It was my cousin’s birthday and I just knew I had to bake a cake that was none of the 3 aforementioned doables. So, that day at gym, I finish my workout, wait for sis to be done with hers and sit down in a corner glued to YouTube. I watched a few videos, gained a couple of ideas, methods, all of which were alien to me. Then, on our way back home we collected all the required ingredients. I make some breakfast, sit down with some chai, and try not to freak out.

I had 3 hours and a stomache full of anxiety to work with. I could do this, right? Right? RIGHT?!

Well, quite miraculously, I… did.

And the result of the experiment blew everyone’s cake stuffed minds. Even mine own.

Here’s how I went about it.


Ingredients

For the cake:

  • 1 cup all purpose flour (maida)
  • 1/2 teaspoon baking powder
  • 1/2 teaspoon baking soda
  • 1/5 teaspoon salt
  • 2 tablespoons cocoa powder
  • 1 cup milk
  • 3 tablespoons melted butter or cooking oil
  • 1/2 cup sugar, powdered
  • 1/2 teaspoon vanilla essence
  • 1 tablespoon vinegar

For the ganache and topping:

  • 1/2 cup chocolate
  • 2-3 tablespoons milk or cream
  • 10 Oreo cookies (I used two small packs of 5 cookies each)


Cake Method:

  • Combine the flour, baking powder, baking soda, cocoa powder, and salt. Keep it aside.
  • In a larger bowl, chuck in all the wet ingredients and stir till everything’s well incorporated and the powdered sugar has dissolved.
  • Add a third of the flour mix to the wet and fold the batter. Add another third, combine. And the last third. Make sure there are no lumps.
  • Preheat oven to 200ºC and prepare your baking tray. I oil mine then sprinkle some flour and tap it around and remove the excess.
  • Prepare a water bath for the cake to bake in. You can skip this, but baking in a water bath makes the cake extremely moist. I used a 7″x7″inch square for the water bath. BASICALLY, you pour your batter to your baking pan (I used a rectangular 3″x5″ pan) then place it in a bigger pan and pour hot water in the larger pan up till the water level is 2 inches high. Then you bake it. That’s all!
  • Bake it for 30-35 minutes or till the top has cracked and an inserted  pin comes out clean.


Ganache and topping prep:

  • Microwave the chocolate and milk/cream on reheat mode for 10 seconds. OR put them in a bowl and put that bowl in a larger bowl of hot water. Leave it for a minute or two.
  • Once everything has softened up, stir till it’s nice and thick.
  • Refrigerate for 15 minutes, take it out, stir. Then refrigerate for another 15 minutes and stir. This way, it cools down evenly and you need a ganache that’s thick enough to be spooned out without it running down in drips and runny enough to hold on to the cake.
  • Chop the Oreo cookies with a knife. Please, don’t break them with your hand. I tried with a couple of cookies and it gets messy because of the cream filling. Knife makes it neater.

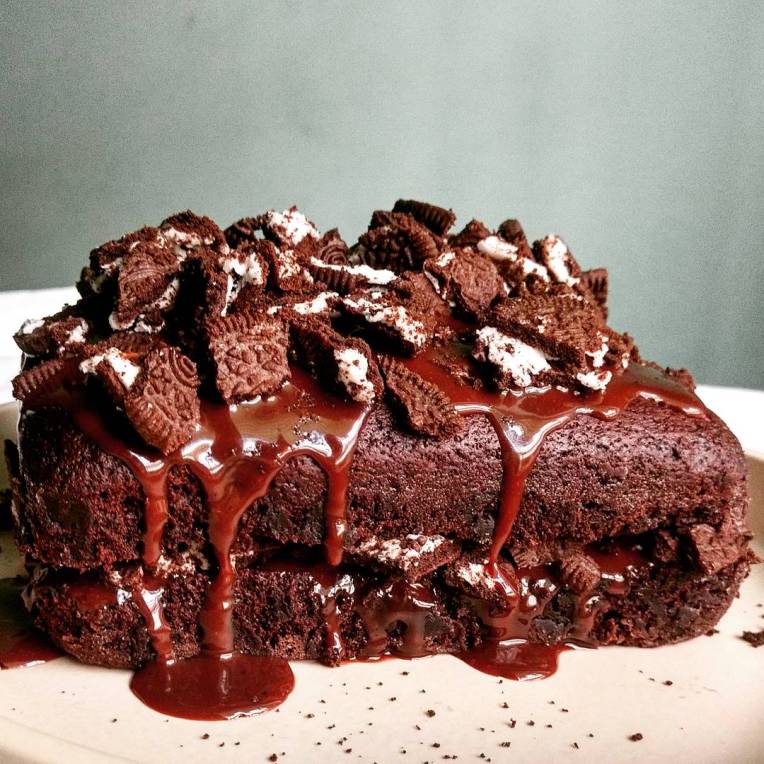
[I couldn’t refrigerate it for long enough and you can see in the picture that it dripped down a bit.]


Assembling:

  • Carefully slice the cake horizontally. and in equal halves.
  • Pour almost half of the ganache on the bottom half and spread it. Sprinkle half of the chopped oreos.
  • Take the top half, and on the side that’s been cut and smeared just a spoonful or two of ganache, so, it sticks to the oreo and stays put when you place it on top.
  • Place the top half on the bottom. Pour the remaining ganache. Spread it a bit but let the natural drips take place. Add the oreos.
  • And most importantly, avoid having it all right away, because trust me on this, it’s very hard to resist!


You can follow me on Instagram  for more recipes and updates.

Focaccia – Whole Wheat and no-knead

IMG_20170706_110731_057

Focaccia is an Italian flat bread, and usually enriched with olive oil, or even the oil from sundried tomatoes that it’s topped with.

But this recipe uses minimal amount of oil, me being on a diet and all that. So the quantity of oil used is negligent in comparison to traditional ones, but it’s healthier, and there isn’t much difference in terms of taste.

IMG_20170706_112131_755.jpg
Ingredients:

  • 1 1/2 cup whole wheat flour (to use 1 first then half later)
  • 1 tablespoon active dry yeast
  • 1/5 teaspoon salt
  • 1 cup water
  • 1 1/2 teaspoon oil (olive/canola. I used canola)
  • Sliced veggies and herbs of your choice to top it with (suggestion: rosemary/thyme/tomatoes/onion/garlic/capsicum/olives)


Method:

  • In a large bowl, combine 1 cup flour and yeast. Add the salt. Stir. Add water. Give it a nice stir till everything is well combined and resembles a sludgy mixture. Wrap the bowl in cling film or cover with a lid, and leave it in a quiet corner where  nobody disturbs it for the next 6-12 hours. You can leave it out on the kitchen counter overnight.

IMG_20170705_131203575

  • After 6-12 hours, it’ll have doubled up in size and quite bubbly on the surface. Letting it rise for a long period of time formed the gluten/bubbles. Add the remaining flour and mix it up. You’re looking for a sticky and wet dough, so, do not fret if you’re staring at a messy dough.
  • Oil a baking tray with at least 1/2 to 1 teaspoon oil. Keep your finger tips oiled, to prevent the dough from sticking to your hands. Take dough out of the bowl and carefully place it on the tray. Drizzle the remaining oil and flatten it with your fingertips till it’s an inch or 1.5 inch thick.
  • Gently pull the edges of the dough up and inwards to create a smooth edge. Flatten accordingly. Poke the dough with your fingertips to create 1/3 inch deep indents. Gently place your veggies and sprinkle your herbs. Cover the tray with cling film or a lid and let it rise for 30 minutes.

IMG_20170705_142403642

  • Then bake at 200°C for 20 minutes then at 220°C for another 20 minutes or till it’s done and an inserted pin comes out clean and without crumbs.


For more updates and recipes follow me on Instagram. 

IMG_20170706_135332_340.jpg

Instant Chicken Nuggets Satay


RECIPE: (makes 6)

Ingredients:

  • 6 ready-to-fry frozen chicken nuggets

For the Satay sauce:

  • 2 tablespoons of creamy Peanut Butter (I used my Homemade Peanut Butter)
  • 1/2 inch of ginger, crushed/grated
  • 4 cloves of garlic, crushed/grated
  • 1 1/2 teaspoons honey
  • 1/2 teaspoon lemon juice
  • 1 teaspoon coconut oil (I used Patanjali Edible Coconut Oil)
  • Two large pinches of ground black pepper
  • Salt to taste

Directions:

  • Combine the satay sauce ingredients in a bowl. Preheat oven to 220°C.

IMG_20170602_141815394

  • Line a baking tray with foil (this helps avoid burning and prevents it from sticking to the tray, which would make it difficult to remove the nuggets after they’re done).
  • Coat each nugget with the peanut butter mixture. It’ll be a bit difficult but the trick is to – pat a enough mixture on top of a nugget, then place it on the tray with the mixture facing down, then pat some more on the bare top. As it cooks in the oven the excess on the top will slide down, covering the sides as well.

IMG_20170602_142311733

  • Bake for 15-20 mins or once the satay sauce looks a tad brown on the edges and the nuggets are cooked through.

You can drizzle a bit of honey and lemon juice on top

IMG_20170602_221613_812

Enjoy!

You can follow me on Instagram for more recipes and updates.

IMG_20170602_221621_826

Ragi, Oats, and Coconut Pancakes


IMG_20170322_012628_935

Incredibly soft, subtle, soothing tones, fulfilling, sweetness is just-right from the coconut and not overpowering. Healthy.

It took me less than 2 minutes to come up with this, about 10 minutes to make them start to finish, and 3 minutes to gobble them down. What a great way to spend 15 minutes, eh? Heh.

IMG_20170321_121703_277

Ingredients:

  • 3 tbsp ragi (finger millet) flour
  • 1 tbsp Quaker oats
  • 2 tsp desiccated coconut
  • 1 cup buttermilk*
  • 1/4 tsp vanilla essence
  • 1/4 tsp cinnamon powder
  • 1/4 tsp baking powder
  • 1/4 tsp baking soda
  • 1/2 tsp canola oil (or olive/vegetable oil/butter)
  • (Optional) For sweetening: 2 sachets of Sugarfree (or 2-3 tsp sugar or 1 tbsp honey)

Method:

  1. Combine all ingredients. Mix till smooth and free of lumps.
  2. Heat a skillet/pan. Grease it.
  3. Pour, cook, flip, cook. Serve.

Buttermilk: Mix 1/2 cup of milk and 1/2 cup of yogurt (dahi) and keep it aside for 10 mins before using.

For more recipes and updates, Follow me on Instagram.

4-Ingredients Oatmeal and Peanut Butter cookies

IMG_20170501_164658_962

Calling this cookie recipe easy would be a gross understatement. It’s a breeze.

It’s quick, can be done in less than 15 mins, start-to-finish, is healthy, and most importantly – addictively appetizing.

A fix for those cookie cravings that you can’t quite satiate without worrying​about calories.

It’s in a small quantity, only 6 cookies, so – craving satisfied, can be made every few days. Share some with a loved one over a cup of coffee. I shared mine (quite grudgingly) with my sister. Recipe can be doubled, tripled, whatever you want.

Great texture from the peanut butter, milk provides enough moisture for the oats to evenly bake through, crisp up, and holds everything well. Chocolate lends the sweetness, that is both, optional and an indulgence. All four ingredients put to good use, isn’t it?

IMG_20170501_164413_530

RECIPE.

Makes: 6 medium sized cookies

Ingredients:

  • 4 tablespoons oatmeal / rolled oats
  • 1 tablespoon peanut butter (I used my homemade peanut butter)
  • 2 tablespoons milk
  • 1 tablespoon chocolate chunks

Method:

  • Preheat your oven to 200°C.
  • Combine everything well. The texture will be crumbly but sticky. It’ll be shapeable. And if you’re using chocolate that melts at room/skin temperature, I’d suggest adding the chunks after mixing everything else up.
  • Scoop out half tablespoon of the mixture, place it on a tray that’s been greased or lined with parchment paper, flatten the dough to 1/4 inch thickness. Repeat with the rest of the dough, placing them an inch apart.
  • Bake for 8 minutes or till the edges brown a little. As shown in pictures. Then let them cool and enjoy! I’m sure you will.


You can follow me on Instagram for more recipes and updates.

IMG_20170501_164134_718

Mango Soy Milk Smoothie

IMG_20170412_140006_562

An amazing post-gym smoothie, fit for those who can slip at least half a mango into their diet every now and then, without shedding tears.

Just like me. Plus, hey! It’s the season of mangoes. Show those oval juicy packages of sweetness some love!

This is a dairy-free recipe, but the soy milk can be substituted with regular milk as well.


Ingredients:

  • 1/2 a ripe mango, sliced
  • 1/2 cup soy milk (I used unflavoured, sugarfree soy milk. You can opt for dairy too)
  • 1/2 cup water (more/less)

Sweetener(honey/sugar/stevia/sugar-free) of any kind: OPTIONAL. I depended on the mango for sweetness. You can also SPICE it up with cinnamon/nutmeg etc.

Directions:

  • Pulse the mango and milk in a blender/grinder. Once smooth, add the water. Pulse again.
  • Pour it out.
  • Serve.


You can also follow me on Instagram for more recipes and updates.

Whole Wheat Crackers

IMG_20161208_095348

The perfect healthy snack. Be it to accompany morning beverages or midnight hunger pangs, these are sure to sate cookie cravings without shocking you on the weighing scale.

Amount of spices mentioned can be increased/decreased as per preference.

Makes: 30-32 crackers.

Ingredients:
1 1/2 cup whole wheat flour
1/2 tsp cinnamon
1/5 tsp crushed cardamom
1/4 tsp baking soda
4 tbsp honey
1/3 cup olive oil (you can use canola as well)
Milk as required (I used 1/4 cup) .


Directions: 
1. Mix the dry ingredients. Add the rest of ingredients in. Form a semi-soft dough.
2. Form 1″ balls, roll them out to 1/8 inch thickness. Cut it in half. Poke holes with a fork (this is important).
3. Grease a baking tray, sprinkle little flour and tap it around the tray. Or use parchment paper to line it with. Lay out as many pieces of dough you can, keeping them 1/2 inch apart.
4. Bake at 190°C/375°F for 10-12 mins. Once they’re golden brown at the edges, take them out. Cool them on a wire rack. Munch!


You can follow me on Instagram for more recipes and updates.

Ragi and Chocolate pancakes (gluten-free & eggless)

IMG_20170318_143851_798

‘Ragi and chocolate’ were not a concept I considered till I saw the recipe for vegan ragi and chocolate pancakes on spoonforkandfood’s Instagram feed. She, Shaheen, has adapted it from Rekha Kakkar’s recipe. So, I went through the recipes and came up with my own within minutes of the discovery. I, as usual, went for ingredients I had at hand and whipped up something that turned out to be recipe worth recurrence.

It’s healthy, gluten-free, sugar free, and eggless. A win on many fronts, to be honest. The texture of the pancakes is silky smooth and just as soft. Soft, without being delicate. The cocoa overpowers ragi’s ragi-esque taste while complementing it as well. Both of which I heartily welcome.


Ingredients:

  • 1 cup ragi (finger millet flour)
  • 2 tablespoons cocoa powder
  • 1 cup buttermilk (1/2 cup milk and 1/2 cup  yogurt/dahi mixed and set aside for 10 mins before using)follow me on Instagram
  • 1/2 cup (or more/less) water for consistency adjustment
  • 2 sachets of Sugarfree (equivalent of 4tsp sugar. You can opt for jaggery or brown sugar as well.)
  • 1/4 teaspoon baking powder
  • 1/6 teaspoon baking soda
  • Few drops of vanilla essence
  • 1/4tsp cinnamon powder (optional)
  • 1/2tsp canola/vegetable oil or butter

Makes: 6 medium sized pancakes

Directions:

  • Combine all the dry ingredients in a large bowl. Add the wet ingredients to it and mix till everything is smooth and lump-free.
  • Heat a pan at medium heat, grease it with a bit or oil or butter. You can skip this if using a non-stick pan or want to go oil-free.
  • Use a ladle or a big spoon, depending on the size you want your pancakes to be, and pour the batter onto the pan. Once bubbles start forming on the top, flip. Let it cook on that side for about 5-10 seconds. Then take it out.
  • Repeat till you run out of batter.


I added a dollop of butter as topping because I wanted something salty. You can use any topping you like! Just have fun and a guilt-and-gluten free meal.

You can follow me on Instagram for more recipes and updates.

Whole Wheat Date Buns


IMG_20170104_095600_864

A healthy, and more importantly, a NO KNEAD recipe. This calls for absolutely no kneading.

Flavours are soothingly sweet and not oversweet. The chunks of date offer an interesting texture. With a proofing time of 4-6 hours, you’re left with the required gluten structure perfectly substituting the kneading that you’ll be throwing out the window.

IMG_20170103_170224_444

Ingredients:

  • 3/4 cup whole wheat flour
  • 2 tablespoons all purpose flour
  • 2 tablespoons dates chopped and soaked in 4 tablespoons of warm water for at least 1 hour
  • 1/2 teaspoon salt
  • 1 1/5 teaspoon active dry yeast
  • 4/5 cup water at room temperature
  • 1 tablespoon olive/canola/vegetable/cooking oil
  •  1 tablespoon sugar – optional – ONLY if you want the buns to be really sweet.

Directions:

  • Combine all the ingredients in a large bowl. I use a big spoon. Mix till it resembles a sludgy mess. Cover the bowl tightly with either a damp cloth or a lid. Make sure you’re using a bowl large enough for the dough to double in size without spilling over the sides or sticking to the lid/cover.
  • Keep the bowl somewhere warm and let it proof for 4-6 hours. Proof = rise. The dough will double in size.
  • Once it has proofed/risen, lightly flour a surface and pull the dough out onto the working surface. Handle the dough carefully and avoid putting too much pressure on it or else it’ll deflate.
  • Preheat oven to 190°C
  • Shape the dough into 6 balls. Lightly roll them in the flour. Carefully place them on a baking tray that has been greased then floured. Let it rest for 20 minutes.
  • Bake for 20-25 minutes or till a knife/skewer inserted comes out clean.


Enjoy!
I had a couple of these buns with some homemade peanut butter and a spicy omelette. Good times.

You can follow me on Instagram for more updates.