Roasted Rosemary Chicken stuffed Braided Bread

Makes: 2

Roasted Rosemary Chicken Filling:

Ingredients:

  • 7-8 pieces of raw chicken, washed
  • 2 medium sized potatoes, peeled and cut into 6 pieces each
  • 8-10 cloves of garlic, peeled and whole
  • 1 large onion, diced into 1” or larger cubes
  • ¼ teaspoon pepper
  • ¼ teaspoon dried or fresh rosemary
  • ½ teaspoon cooking oil (I used canola oil)
  • Salt to taste

Directions:

  • Preheat oven to 200ºC. Prepare a baking dish by greasing it with a few drops of oil.
  • Toss all the ingredients in a bowl till everything is well coated.
  • Bake for 35 minutes.
  • Once done, let it cool down for a bit, then mash it all up with a fork/spoon. Remove the bones if not using boneless chicken.

Bread dough:

  • 2 cups refined flour (maida)
  • 1 cup lukewarm milk
  • ¼ cup lukewarm water
  • 1 tablespoon active dry yeast (or instant dry yeast)
  • ¼ teaspoon sugar
  • 1/5 teaspoon salt
  • 1 teaspoon cooking oil/melted butter

PhotoGrid_1507774479608

Directions:

  • Activate the yeast by adding the yeast to the lukewarm water with sugar. Let it rest for 10 mins. Once frothy, you know it’s ready for use.
  • Take the rest of the ingredients in a large bowl and add the yeast mixture to it. Form it into a dough. Cover the bowl with cling film or a lid or a kitchen towel. Let it rest for an hour.
  • After an hour, when the dough has doubled in size, punch it down. Divide into two balls.
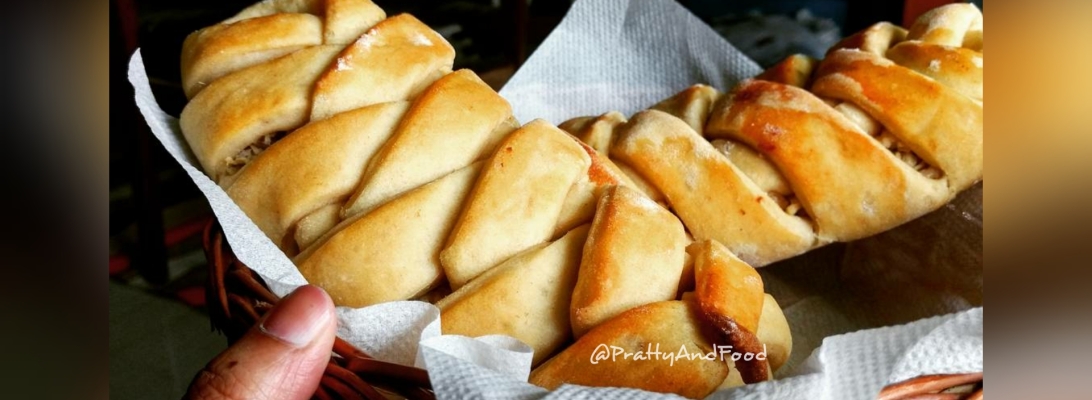
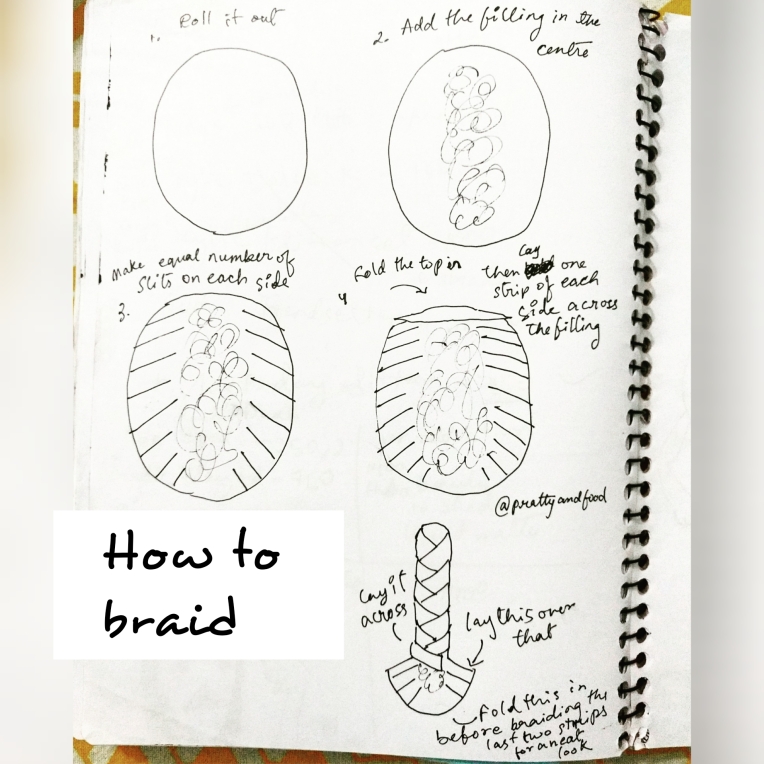
  • Roll one out. Follow the diagram (or google/youtube how to braid bread). Repeat with the second piece of dough.
  • Lightly grease then flour your baking tray. Move the braided pieces to them. Cover and let them rest for 30 mins.
  • Bake for 25 mins at 180ºC or till an inserted pin comes out clean indicating the dough has cooked through.


Enjoy and do leave some feedback either on my Facebook page or Instagram profile! Bon appétit! 🙂

Coconut Prawns

IMG_20170616_133412_383

It takes a maximum of 5 minutes to prepare everything, and 6-7 minutes to cook it all.

I may be an amateur cook but this is something I’ve been making for sometime and it’s perfect every time. And I say that not to praise myself, but to shed light on how using only a few ingredients you can make something delectable and save yourself a lot of time! That’s one of the reasons I’m intimidated by cooking – The time it can take and the amount of ingredients and spices you have to keep in mind while at it.

This recipe eliminates both of those worries of mine.

Ingredients:

  • 2 cups of cleaned and de-shelled prawns
  • 1/4 teaspoon turmeric powder
  • Salt to taste
  • 1 tablespoon coconut oil
  • 2 medium sized onions, chopped
  • 1 dry red chilli
  • 3 tablespoons desiccated coconut
  • 1 tablespoon curry leaves (10-15 leaves), cut in half
  • 1/2 cup water


(hover cursor on the pictures to see the captions)

Directions:

  • In a bowl mix the prawns, salt, and turmeric powder. Set it aside.
  • Heat the coconut oil in a pan. Chuck the red chilli and onions in. Saute.
  • Once the onions have softened up a little, add the prawns. Keep tossing.
  • Add the desiccated coconut and curry leaves.  Mix everything till evenly coated.
  • Take the half cup of water and add a little by little every 2 minutes. Keep stirring.
  • Cook till the prawns have cooked through.


Aaand you’re done! That’s all. Easy, isn’t it? Wait till you get to have a bite.

It’s not too spicy, it’s a bit sweet from the coconut, but the salt balances it out. And the reason I let the onions soften and not brown is so that it adds a nice body to the dish. And it’s a step up from being crunchy, while being a step away from being a total mush.

Well, bon appetit!

You can follow me on Instagram for more recipes and updates.

3 Ingredients Granola!

IMG_20170912_103519_942.jpg

Prep time: 5 mins

Baking time: 30 mins

Ingredients:

  • 1 and 1/2 cup  old fashioned rolled oats
  • 2 tablespoons black raisins
  • 3 tablespoons peanut butter


Method:

  • Preheat your oven to 180°C
  • Combine the oats and peanut butter till  are no lumps of peanut butter.
  • Line a baking tray with parchment paper. Pour out the mixture and flatten evenly with the back of a spoon.
  • Bake for 15 mins at 180°C then take it out, add the raisins and mix it all up.
  • Bake for another 15 mins. Let it cool down before storing in an airtight container.

Ragi Chocolate Oreo Cake

Ragi and Chocolate make for a great pair because the characteristics of cocoa cloak ragi’s original flavour. And all you get is a soft, smooth, moist chocolate cake and no one, seriously no one, would be able to tell it was made with ragi (finger millet) instead of all purpose flour.

This cake is gluten-free except for the inclusion of Oreo cookies, which are highly optional.

I made these for lunch. I had 3 squares. 1 for sis. The remaining two I finished… One on the very same night with filter coffee and the other with a cup of warm milk on the next.

I’d call these brownies but I’m waiting to make proper ragi brownies sometime soon. And I’ll make them fudgy. Until then, have a slice of this cake.

IMG_20170718_162214_960

Ingredients:                                      (makes: 6 medium sized squares)

  • 1 cup ragi (finger millet / mandia)
  • 1 1/2 tablespoon cocoa powder
  • 1/4 teaspoon baking powder
  • 1/4 teaspoon baking soda
  • 1 tablespoon peanut butter
  • 1 cup milk
  • 1 tablespoon honey for sweetening (you can add more if you want your cake to be really sweet)
  • 1 tablespoon canola oil (or olive oil or melted butter)
  • 3-4 oreo cookies, chopped. (chop with a knife, breaking with hands gets messy)

Directions:

  • Combine the ragi, cocoa powder baking powder, and baking soda.
  • Add the wet ingredients. Form the cake batter. Ensure there are no lumps and everything is well incorporated.
  • Add the chopped oreos. Mix. Prepare your baking tray. I used a 3″x5″ rectangular pan.
  • Bake at 200ºC for 25-30 mins. It’s done when an inserted pin comes out clean!

IMG_20170718_153004_722

Enjoy.

You can drop me a message on my Instagram or Facebook page regarding any questions or queries. I can also be reached at prattyandfood@gmail.com

You can also follow me on Instagram and Like my page on Facebook for more updates.

Assorted Cookies Hack

How to make assorted cookies using one base recipe and turning it into a variation of 3 doughs from one. This one features: Chocolate, Nutmeg, and Jamun Jam.


Base Cookie Dough:
(makes: 18-20 cookies, depending on the size you make them in!)

  • 1/3 cup oil/softened butter (You can use both as long as the total amount of both when added is 1/3 cup)
  • 2/3 cup sugar, powdered
  • 1 egg at room temperature
  • 1/2 teaspoon vanilla essence
  • 1 cup all purpose flour + another 1/2 cup to adjust the dough consistency
  • 1/4 teaspoon baking powder

Directions:

  • Cream the butter and sugar by whisking them. Add the egg and vanilla essence. Mix till well incorporated.
  • In a separate bowl, combine the 1 cup flour and baking powder.
  • Add the flour mixture to the wet mixture, form a dough.
  • If it’s too sticky and sludgy, add some from the 1/2 cup flour reserved for this purpose. You’re looking for a slightly wet and sticky dough.
  • Baking temperature and time: 15-20 mins at 200ºC on a parchment paper lined baking tray, or one lightly oiled then floured.

IMG_20170710_180440_684

VARIATIONS.

Divide the cookie dough into three equal portions.

For Chocolate Cookies:

Add 1 1/2 tablespoon cocoa powder and knead it into the dough till it’s well combined. You can add chopped chocolate chunks or chips to it. Done.

For Nutmeg Cookies:

Add 1/4 teaspoon of grated nutmeg. Knead! Done.

For Jamun Jam Cookies:

Roll your dough into 1″ balls. Lightly flatten down on your prepared baking tray. Keep them  1.5″ apart. Press the center of each a bit. Place your required amount of jam, press the jam down gently with the back of the spoon. Done.

You can check out my Jamun Jam recipe that I used for this.

If you have any questions about my recipes or queries, drop me a message on my Instagram or Facebook page.

Jamun Jam

I never got around to making a proper post archiving the recipe before it fades from my memory. So here it is. The thing I’ve raved about so much. And made cakes and cookies with.

Ingredients:                                                       (makes: 1 cup jam)

  • 1 cup deseed and chopped jamun (Indian black plum)
  • 1/2 or 1/3 cup sugar (depending on your sugar tolerance levels)
  • a couple of pinches of cinnamon

Directions:

  • Bring the deseeded jamun and sugar to a boil on medium heat. Keep stirring it to avoid burning at the bottom.
  • Once it reaches a custard-like thick consistency, turn off the heat. Add the cinnamon powder and stir it.
  • Immediately transfer to an air-tight container. Close the lid AFTER it has cooled down, and refrigerate. This will stay good in the fridge for 2-3 weeks.

I’ve used this jam on toasts, in cakes, on cookies. It’s amazing. Trust me.

IMG_20170626_141134_904IMG_20170710_180440_684

Click on the pictures for the recipes.

For any questions about recipes or any queries, you can drop me a message on my Instagram or Facebook page.

You can follow me on Instagram and Like my page on Facebook for more updates.

Chocolate Pudding Glaze and Rum Glaze for donuts and more

IMG_20170709_171652_360

These are the two glazes I used for my Baked Whole Wheat Donuts. They can be assembled in a jiffy, and are crazy delicious.

Suitable for: donuts, pancakes, cupcakes, cakes, whatever you like. 

IMG_20170709_171145_706
Dusted with sugar after coating, for an added snowy effect.

Chocolate Glaze Ingredients:                (makes: 1/3 cup glaze)

  • 1/3 cup milk
  • 1 tablespoon cocoa powder
  • Sweetener: (if not using chocolate) 1 teaspoon sugar or 2 tablets of sugarfree or any substitute of equivalent measure
  • 1/2 teaspoon cornstarch
    (In India it’s referred to as cornflour. To be clear: you need the thickening agent used in soups)
  • 1 teaspoon butter

Directions:

  • Mix the dry ingredients. Add milk little by little, stirring after each addition. Make sure there are no lumps. It’s best to use lukewarm milk for this.
  • Heat it on medium heat and keep stirring. Once it starts to thicken, turn off the heat.
  • Add the butter. Keep stirring till it melts and is well incorporated. It’ll be thick, rich, and creamy. Done.

You  can use this as a glaze to dip donuts/churros/cupcakes in or a topping for pancakes. Even dousing cakes with this is a great idea. I’m love, can’t you see? I feel this, my lover, is versatile. And I genuinely believe so.


IMG_20170709_171309_819


Rum Glaze Ingredients:               (makes: 1/4 cup glaze)

  • 1/3 cup sugar, powdered (make sure they’re finely powdered! Mine remained a bit grainy)
  • 2 tablespoons of rum

Directions:

  • Chuck into a bowl, mix, mix, mix! Till there are no lumps.

Best for glazing donuts, cupcakes, rum cakes; go experiment!


You can follow me on Instagram and Like my page on Facebook for more updates. Have a good day!

Baked Whole Wheat Chocolate Donuts


IMG_20170709_171145_706 IMG_20170709_171135_047

What I was up to for Sunday baking. If I recall correctly, having baked whole wheat chocolate donuts for lunch, could never be a bad idea, could it? Nope. Especially when these donuts are like brownies in donut form. Brownuts…? Maybe.

These even come with two other recipes of how I made the glazes! Chocolate pudding glaze and rum glaze. This must be what turning dreams into reality must be like.

Ingredients:

  • 1/2 cup rolled oats, ground till it’s flour
  • 1/2 cup whole wheat flour
  • 2 tablespoon unsweetened cocoa powder
  • 2 tablespoon dark chocolate chunks / any roughly chopped chocolate
  • 1 tablespoon oil (I used canola)
  • 1/2 cup milk
  • 1/4 teaspoon salt
  • 1/2 teaspoon vanilla essence
  • 1/4 teaspoon cinnamon powder (optional)
  • A dash of grated nutmeg (optional)
  • 1 tablespoon active dry yeast
  • 1/3 cup lukewarm water
  • For sweetening: 2 tablespoon sugar (OPTIONAL) or any equivalent (stevia/sugarfree)

IMG_20170709_171156_990
Moist like a brownie.

Directions:

  • Add the yeast to the lukewarm water, add the sugar. Stir a few times. Leave it in a warm spot for 10-15 mins to activate it. If it’s bubby and frothy by then, it’s activated and ready for use.
  • In a large bowl, combine all the ingredients and form a sludgy dough. It’ll be stickers than regular bread/roti dough, but drier than a cake batter.
  • Cover the bowl with cling film or a lid and let it rest for 90 mins. 90 mins later, the dough would’ve doubled in size.
  • Give it a light knead. Prepare your baking tray by oiling it lightly then sprinkling flour. Tap the flour around and remove the excess.
  • Keep your hands a bit floured or oiled so it’s easy to shape the donuts without them sticking to your hands.
  • Shape them into the regular donuts. I shaped mine a bit small and shaped 8 in total.
  • Place them at least two inches apart from each other. Cover in cling film. Let it rest for 30-40 minutes and not longer.
  • Bake at 200ºC for 12-15 mins or till an inserted pin comes out clean. Done.

IMG_20170709_171652_360

I did two glazes for these; a chocolate pudding glaze and a rum glaze. I’ve made a separate post for it do check it out.


You can also follow me on Instagram and Like my page on Facebook for more update.

Whole Wheat Marble Pancakes with Homemade Chocolate Sauce

IMG_20170708_191120_421

I’m in that zone where I may not be craving it but I’m definitely clawing at chocolate flavoured things the way a zombie would paw at your pretty little brain. Sans the sound effect, obviously.

I’ve been asked every now and then to develop an eggless and whole wheat pancake recipe. And I did. Except, that, I went a step ahead and turned it into a marble one. And, for the uninitiated, cakes and pancakes etc., with this design are called marble. Marble cakes, pancakes, cookies, ice cream. Possibilities are endless.

Anyway, here’s how I went about it.


Ingredients:

For the pancakes:                                   (makes: 6-7, medium sized) 

  • 1/2 cup whole wheat flour (atta)
  • 3/4 cup milk
  • 1/4 teaspoon baking powder
  • 1/4 teaspoon baking soda
  • 1/2 teaspoon vanilla essence
  • 1 tablespoon cocoa powder
  • For sweetening: 2 teaspoons of sugar / any substitute / 2 tablets of sugarfree
  • Oil/butter for cooking

For the chocolate sauce:

  • 1/2 tablespoon cocoa powder
  • 2-3 tablespoon milk
  • For sweetening: 1 teaspoon sugar / 1 sachet of sugarfree / a couple of pieces of chocolate of your choice


Directions:

  • Combine the whole wheat flour, baking powder, baking soda, and baking powder. Add the 3/4 cup milk and sweetener. Mix till everything is well incorporated.
  • In a separate and smaller bowl, pour out a third of the batter. Add cocoa 1/2 tablespoon cocoa powder, and 1 tablespoon milk. Stir.


  • Take the vanilla bowl and try to collect/push the batter to one side. And on the emptied side, pour the chocolate batter.
  • Give everything just TWO slow stirs, maximum.


  • Heat a pan, preferably a non-stick (I used a not so non stick hehe) and add a few drops of oil or grease it with a bit of butter.
  • Take a tablespoon of the batter (avoid stirring the batter) and place one on the pan. I make them like 3″ in diameter so being medium sized, 3 fit on one pan, and it makes my work easier anyway.
  • Let them cook on each side for at least a minute of low-medium heat before taking them out.


Chocolate Sauce:

If using a microwave:

  • Microwave the milk for 10 seconds on the reheat mode. Add cocoa powder and sweetener (if using). Stir till there are no lumps.  Add the chocolate (if using).
  • Microwave for another 10 seconds. It’ll boil and bubble. Take it out and stir again. Done.

If using a stove:

  • Heat the milk till it’s hot but not boiling. Turn off the heat. Add cocoa powder. Stir. And the sugar/chocolate (whichever you’re using). Stir.
  • Heat it again, and turn off the heat the moment it begins to boil. Done.


You can follow me on Instagram and Facebook for more updates and recipes.


IMG_20170708_185649_370 IMG_20170708_155616_127